

My love for retro 80s and 90s 8-bit video games is a big part of my nostalgic vibe. From collecting old games and consoles, to video game history preservation, to pixel art and chiptune music. I’ve only started to dabble into modding machines, but its a crafty venue I plan on spending more of my time experimenting with sometime in the future.
Solstice Themed Nintendo Entertainment System
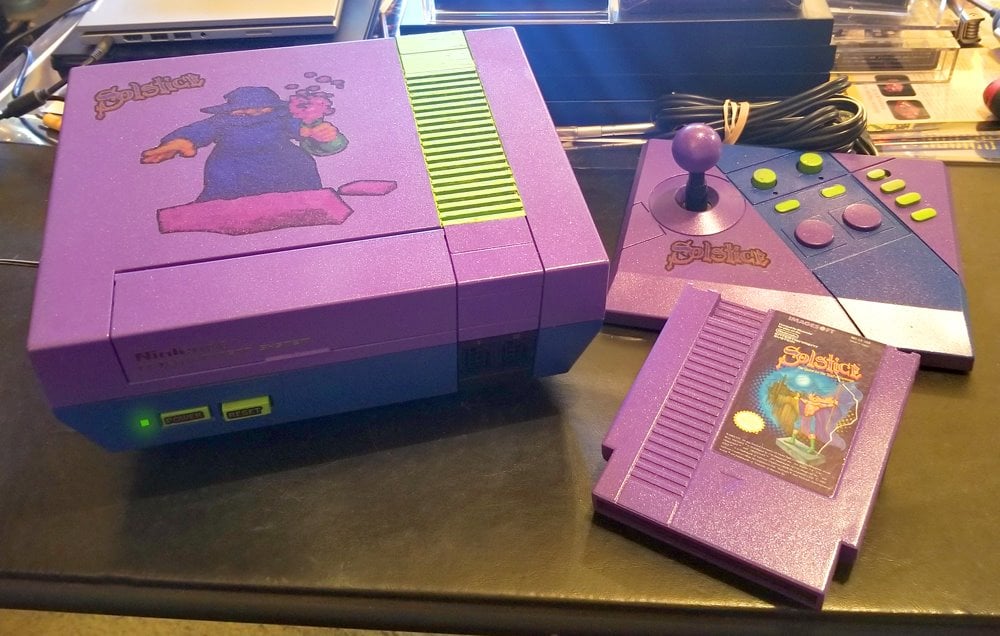
This, the first NES mod I’ve ever done, was created as a part of my “Solstice Museum” collection. A way to express my enjoyment of the game as well as add to the collection’s modern non-contemporary category.
The top half of the case was done in glitter-coat purple paint, neon green blacklight-reactive paint for the accents, and the base done in matte blue matched to the hue of the wizard, Shadax’s robe. The logo, button text, and depiction of Shadax were custom-made semi-opaque vinyl transfers put on before triple-layer topcoat.
The metallic silver NES logo was secondary-market mod, and I swapped out the traditional red LED with a green to match the accents. I also installed a switch-triggered sound module and speaker so it plays the Solstice theme song whenever the cartridge bay door is opened.
And, just for kicks, and just to round the mod out, I also painted up a Solstice: Quest for the Staff of Demnos, cartridge in the glitter-coat purple paint with top coat to seal it. Masked the original cartridge label for the painting.
Solstice Themed NES Advantage Controller
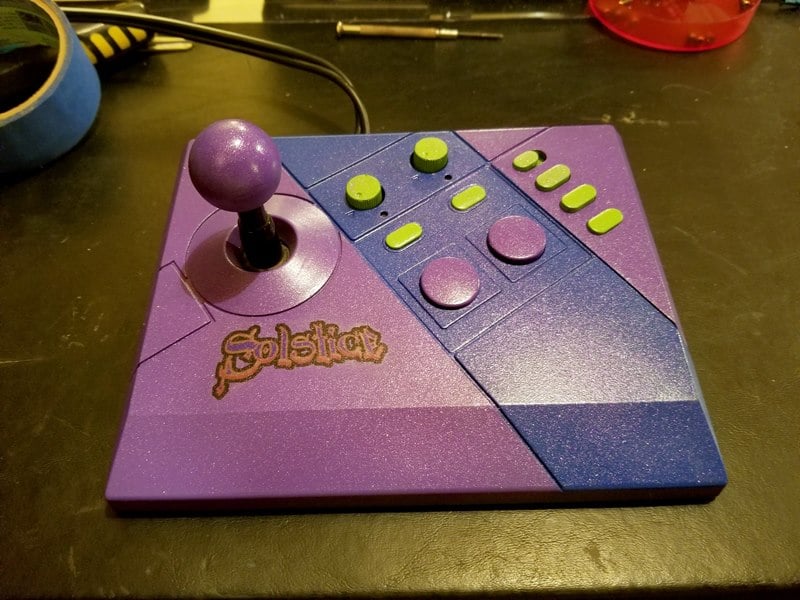
Made in tandem with the custom Solstice NES console. When I was a kid, I almost always used the advantage controller to play Solstice; its joystick just felt more intuitive to me for the isometric design of the gameplay.
I followed the theme here with the glitter-coat purple, but also used glitter-coat blue paint rather than the matte as it felt like it fit better with the “single surface” of the controller face. And, once again, blacklight-reactive neon green accents.
I wanted to swap out the red LEDs for green on this as well, but due to the way they are built, it was going to require potentially damaging the board, and rather than risk it, I just left them be. The logo was another custom-made semi-opaque vinyl transfer.
I applied the same triple-layer topcoat here, but ran into a bit of an issue as a result. The layers of clear sealing coat increased the size of the buttons my just a few micrometers—enough that the buttons would sometimes “stick” when pressed. So I ended up having to take it apart, and sand down the topcoat on the sides of all the buttons to prevent that.
Gameboy DMG-01 Mod
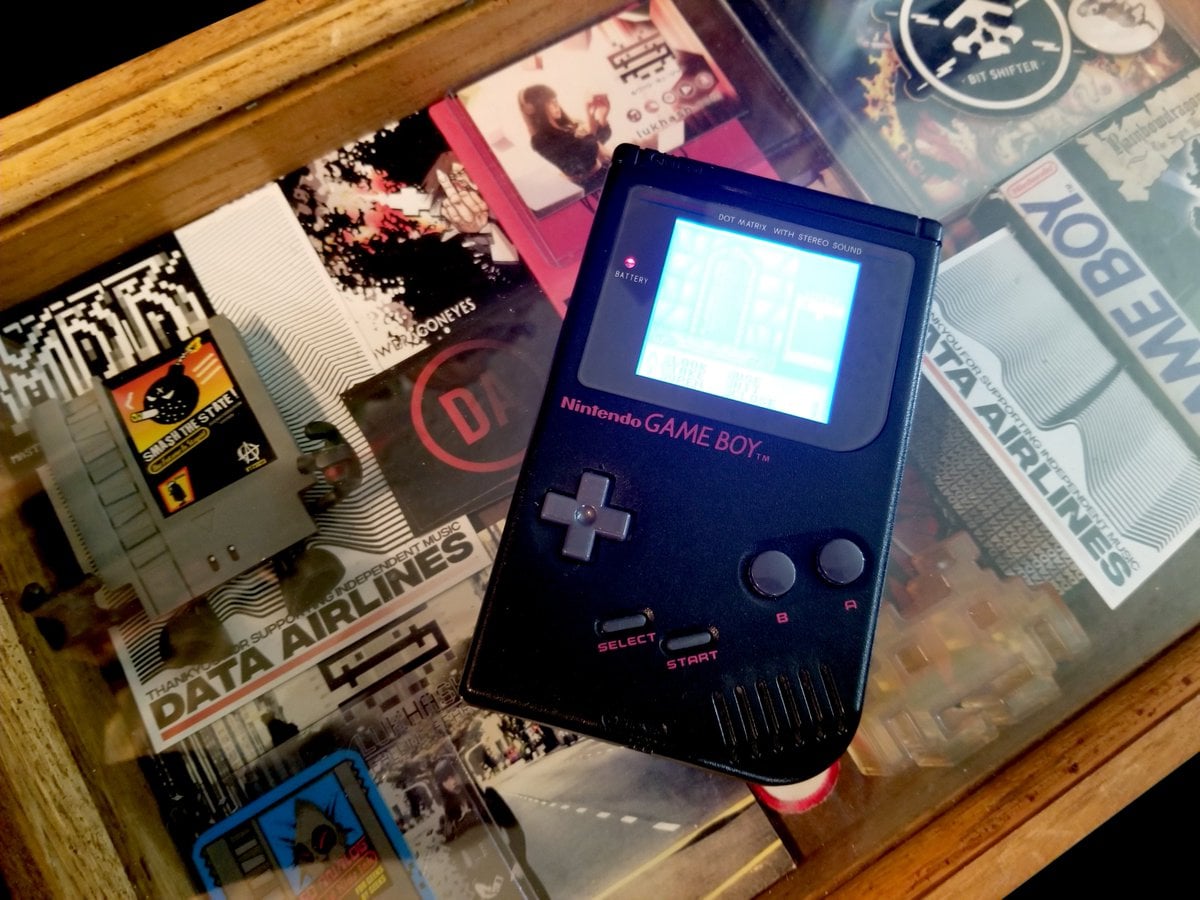
This was a fun little mod I did to my original Game Boy Classic DMG-01. I didn’t want to use an aftermarket shell, so ended up buying a couple of broken vintage DMG gameboys from the 1995 “Play it Loud!” series (one black and one red), to create a two-tone case.
I went with that color combo because they were the only two original PIL shells that were inverse of one another. I knew I wanted a black theme, and since the print on those were in red (and the LED indicator was red by default), matching a two-tone theme to red seemed like the best fit.
So, I rehoused the grey DMG-01 into a combo of PIL shells with black front and red reverse. I really enjoy how it came out looking. I do think I will eventually swap the buttons out for aftermarket black or red, though. For some reason the dark grey default with the PIL series looks “purple-ish” to me against the black shell.
I also installed backlighting. I almost went with backlit red to match the theme, but every example I could find of it online looked terrible and reminded me of the headache-inducing experience that was the Virtual Boy. I didn’t want to go with the original green-tone either. So, I settled on using the a white V3 mod since, to me, it reminded me of the glow of an oldshool CRT monitor in the dark. It also made the display really “pop” even in a well illuminated room.